Starting an event page for your business or special event can be as easy as creating a Facebook event page for your business. But the Main difficulty faced by users is How to Create an Event on Facebook?Facebook has made it easier than ever to grow a business by finding an audience interested in your events. Now you can even find customers ready to buy your tickets and promote your event on Facebook.
How to create an event on Facebook in 5 minutes
Here are 5 steps to creating an event on Facebook,
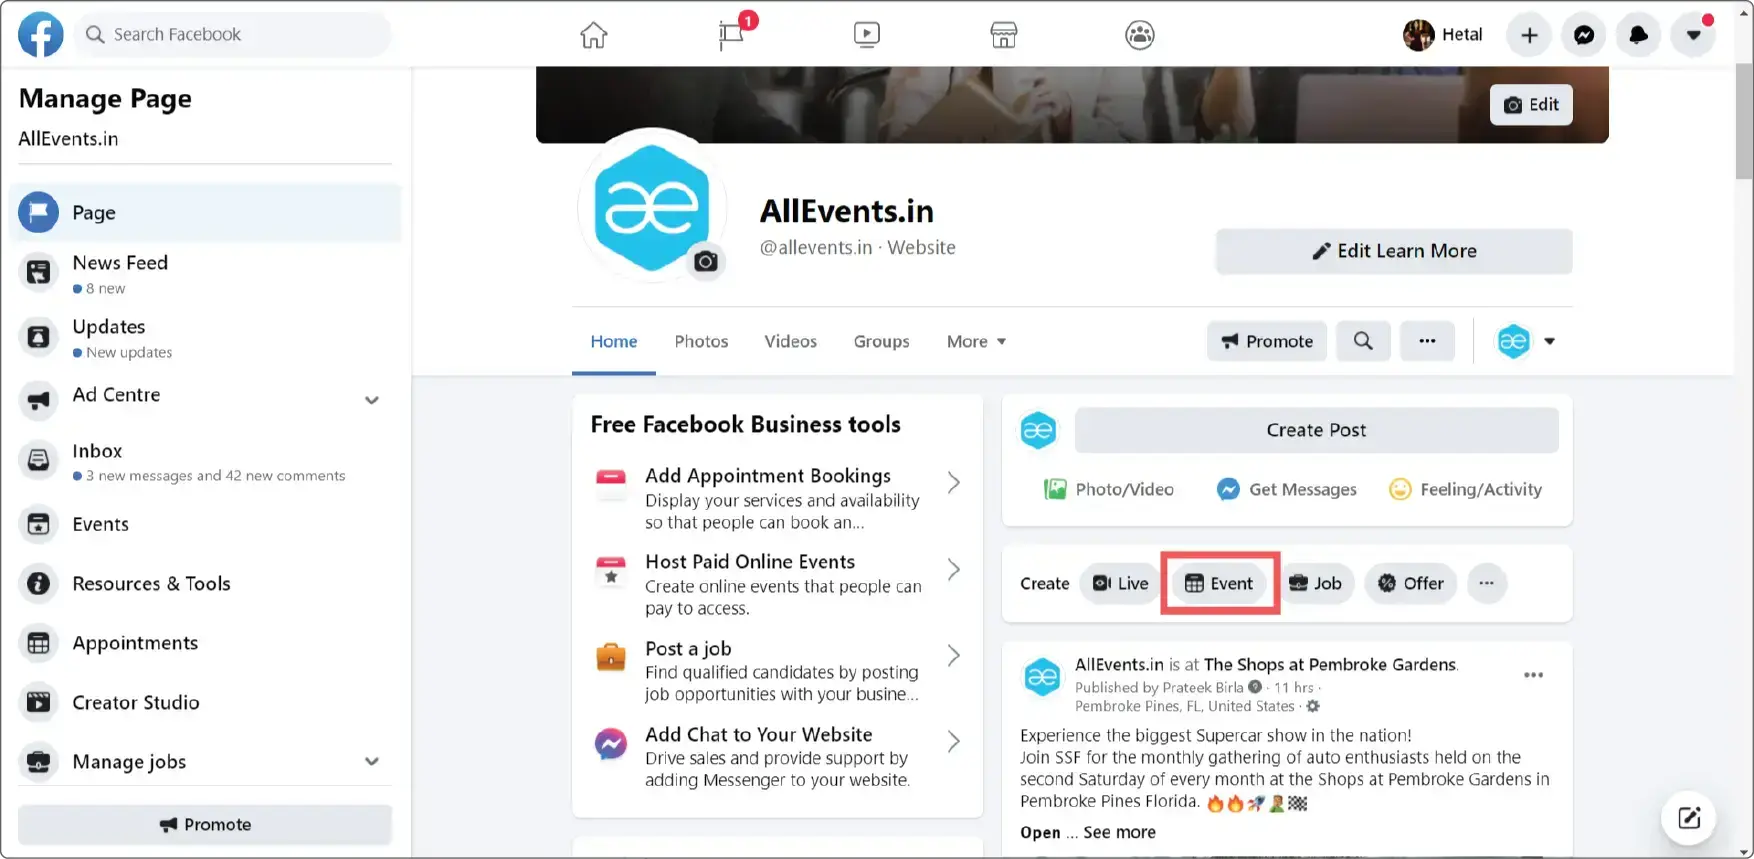
1. From your page, select the “events” tab from the left-hand sidebar and create an event
2. Add event details, and ensure it is search optimized
3. Setup Ticketing and payments
4. Add final details and guest list
5. Hit the Publish Event button
Step 1: Go to your page, and select the “events” tab from the left-hand sidebar
Create Event
Click on one of the “Create Event” buttons that you see on the screen. Choose whether it will go online or offline afterward.
Make it credible and appealing.
Facebook lays out the required info for the event. First, you need to plug in each element. For example, you can add a cover photo or video by choosing “change photo/video” or simply dragging an image from your computer onto the default photo.
Cover photo relating to your brand increases the credibility of your event.
Facebook will ask you to add information (Fill in the required information), Upload all the necessary images and banners to make your event look more credible and appealing. You can use Canva tool to create banner for your event.
Please choose whether you’d like to create a public event on Facebook or keep it private.
Bonus info: If you create a private event, you can change it to public in privacy settings; however, if you create a public event, it cannot be changed to private.
Sell tickets to audience
15M event seekers visit AllEvents every month. Are your events visible to them?
Create a Private Facebook event:
The following will help you make an informed decision on whether to create a private or public event:
If a private event is published to your feed, only the people who have been invited can see it. The rest of your network won’t be able to see it unless they are also invited. That means no one in your network will be able to see the event unless you invite them.
Guests can invite all their friends to an event on Facebook if the admin allows it, and, if invited, these people can view the event page. Also, you cannot share a private Facebook event – you can only invite people to view it.
Create a Public Facebook event:
A public event is visible to everyone and anyone on or off Facebook. They can see things related to your events like the event description, photos, discussion, videos, and more. The event may also be discoverable in search.
Wondering how to change the privacy of a Facebook event?
You can create a private event only from a Facebook profile; if you create an event from the Facebook Business page, you cannot create a private event as all the Facebook business pages are set to public by default.
Step 2: Add all of the details
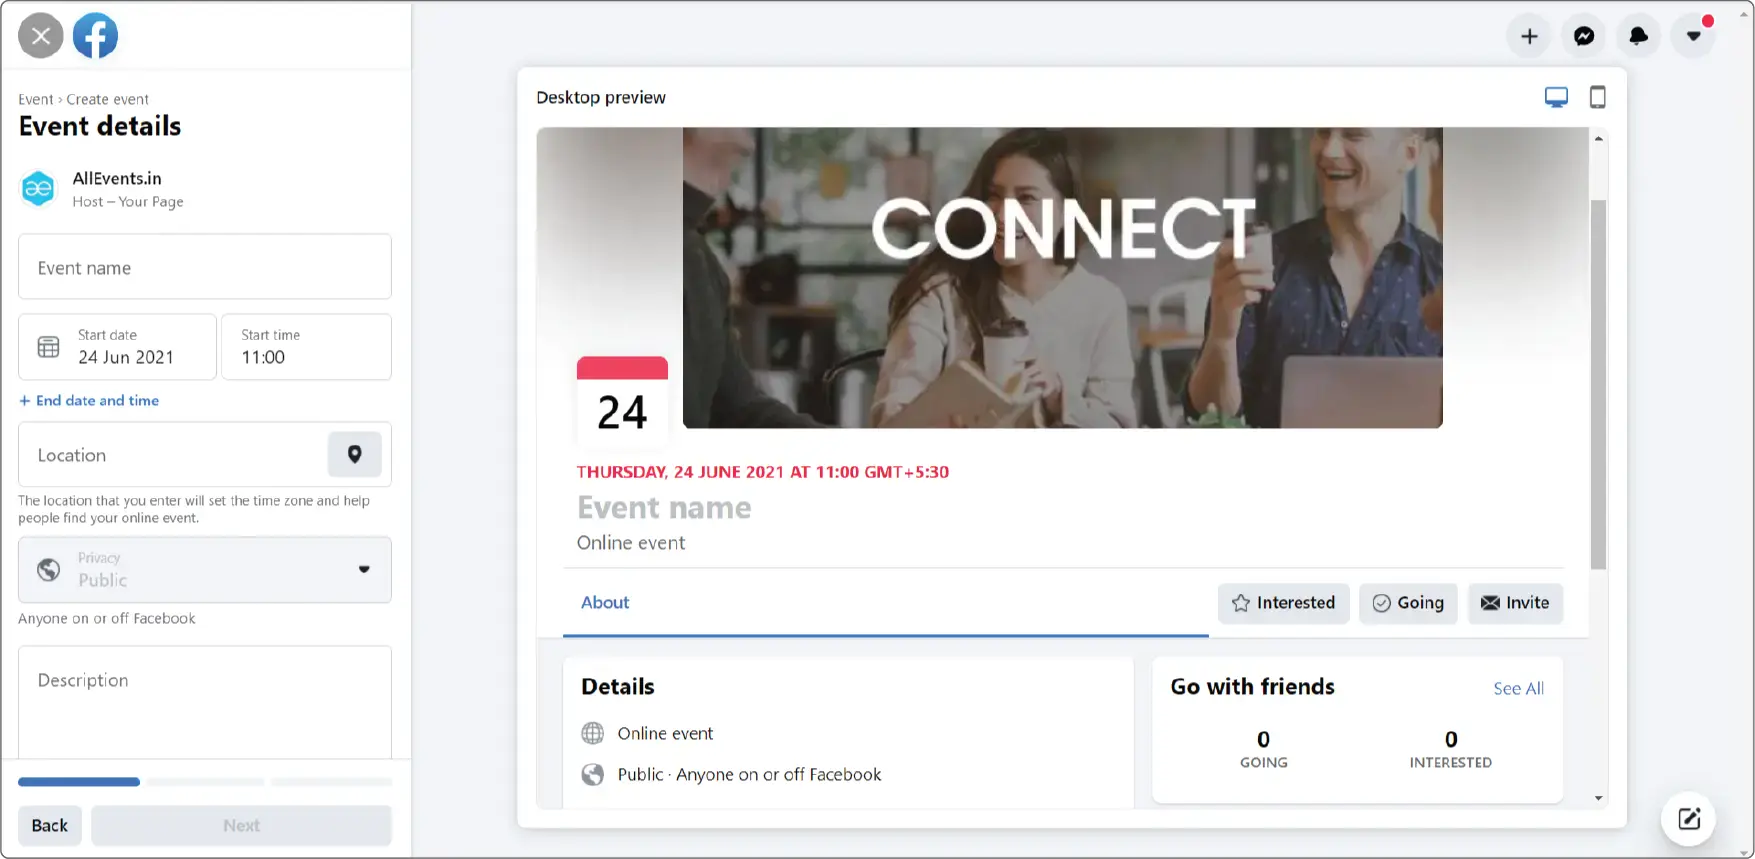
Whether you choose to create a public or private event, information includes:
- Your event name
- An event cover photo or video
- A location
- The frequency (you’re given the option to create recurring Facebook events)
- The date and time of your event
- Any co-hosts (for example, a venue that may be hosting your event)
With public Facebook events, you can also add SEO information like category, description, and keywords to help your event become more discoverable. Effective event descriptions and captions play a critical role to tempt the audience to attend your event.
For example, if you were running online art and craft workshop, you may want to add keywords such as “arts,” “craft,” and “online workshop.” Then, the next time someone searches “online arts and craft workshop,” they could find your event with ease, helping to increase registrations and ticket sales. And if your event is taking place in person at a venue, make sure to include the location in your keywords, like “New York” or “Washington.” Use keywords whether you promote a webinar, conference, sports event, or any event.
Step 3: Setup Online Ticketing and payments.
Now when you have successfully laid down all the information for your event, the next step is to set up ticketing for your event so that you can accept payments for your tickets directly from Facebook. You have two options here to sell your tickets on Facebook.
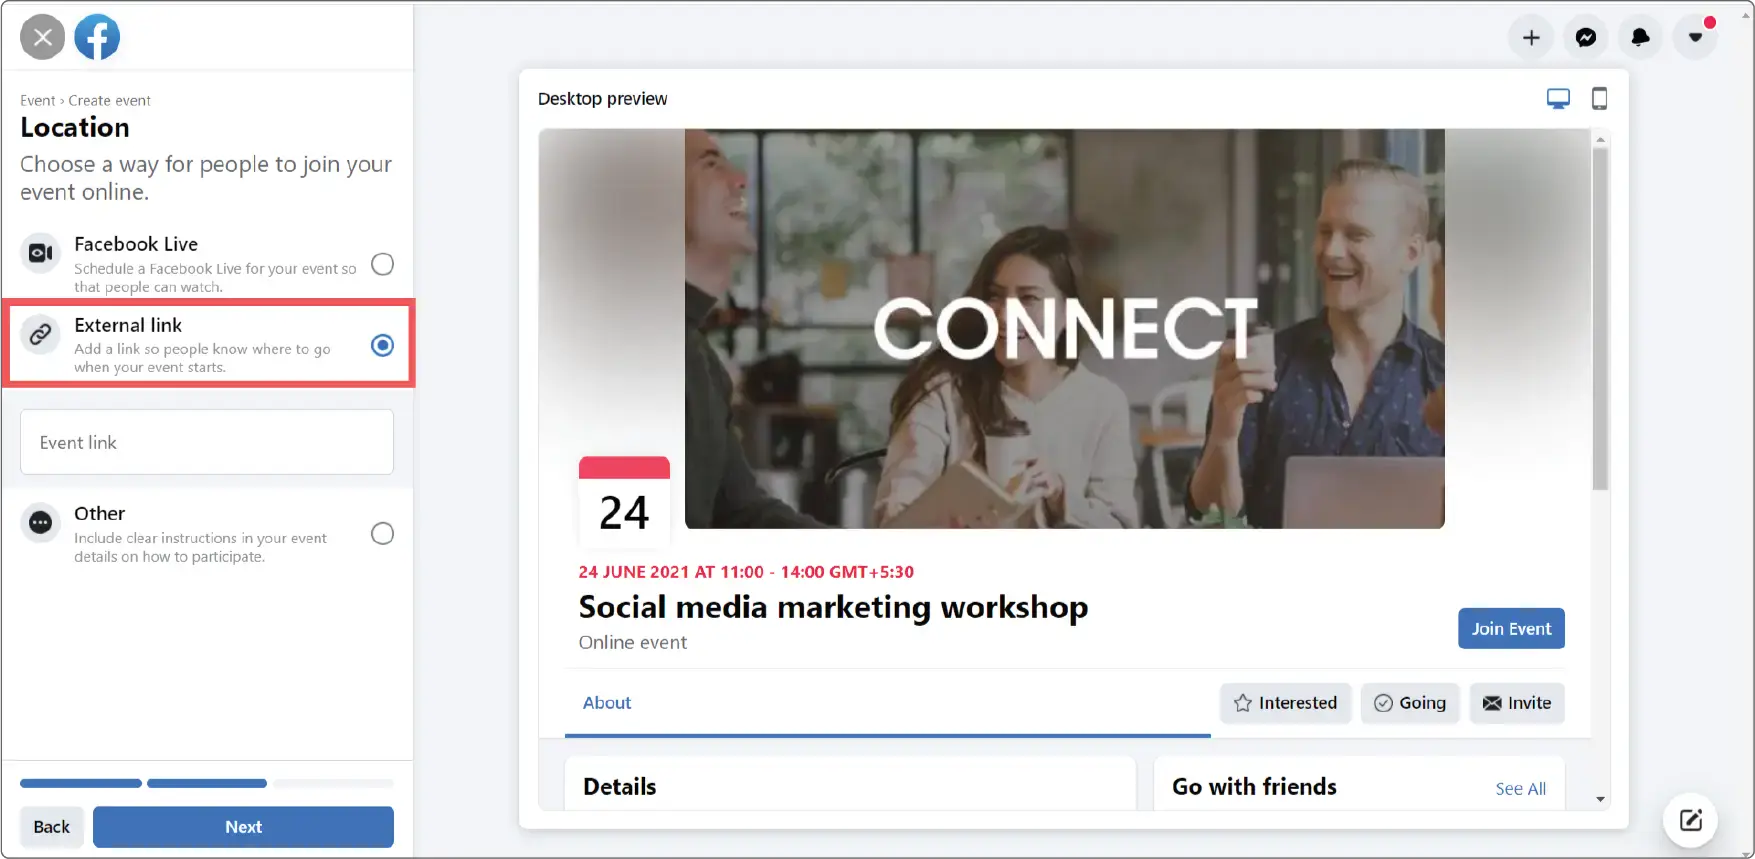
Option 1: Use Direct payment links.
Event organizers usually add their personal PayPal or stripe links to their event on Facebook. However, that is not the best practice to get the best results.
Facebook won’t allow you to set up ticketing for Free Events, online events, or even hybrid events which are popular in the current situation (for example, webinars, conferences, etc.). This will result in you losing out on your attendees’ ticket sales and valuable data that you can use for marketing purposes for your upcoming events.
If you are hosting multiple events or multiple ticket options, you cannot separate the payments for each of them. This can lead to various kinds of confusion.
What to do then? Check out this best option.
Option 2 (Recommended): Use the Event link from Online ticketing platforms.
You can set up ticketing and payments for your event on a dedicated event discovery platform where you can delight yourself with a highly organized ticketing system designed to provide you with all the analytics and real-time marketing insights of your events and attendees to maximize your ticket sales.
AllEvents.in an Online ticketing platform where you can get your own shareable event landing page and ticket links for direct payments to add to your Facebook page. It is very quick and simple. Create an event on AllEvents.in, activate ticketing and payments, and add that ticket link to your events on Facebook. Make sure you have a well-designed event registration page to provide your audience a smooth experience.
Check all benefits of selling tickets online with GoAllEvents
It will provide your customers with a seamless booking experience and boost your ticket sales.
Step 4: Final details and guest list
Once you fill out the information on the date and time, scroll through the last few fields. Co-hosts are other pages or people that are also involved with the event. If you add a page, the event will also show up in their events tab.
Finally, decide what permissions you want to give guests, allowing them to post on the event wall to see the full guest list.
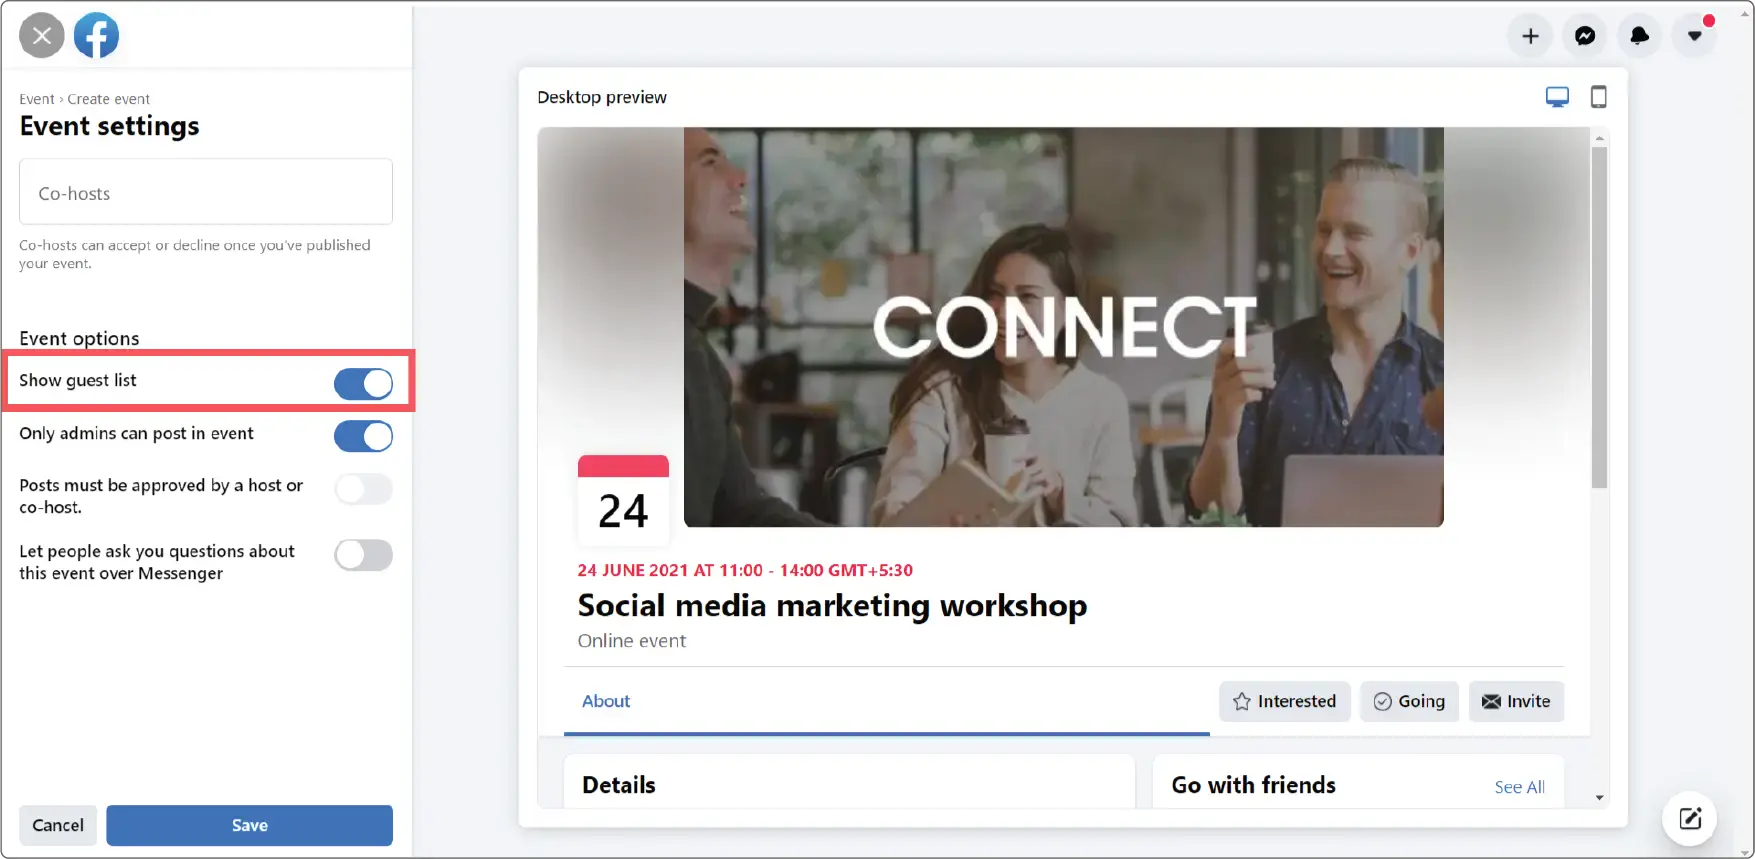
Good to know: You can hide the guest list from the public or other attendees by unchecking the “Display Guest list” box.
Step 5: Publish Event
Hit “Publish” and your event will go live.
How to Create an event from Facebook business page
If you want to create an event from the Facebook business page, follow the steps below. Unfortunately, you cannot create a private event from a Facebook business page.
- Open your business page on Facebook
- Use the dropdown next to “Share” and select “Create Event”
- Add all of the details, such as the event name, location, time, and description
You can also create a recurring Facebook event. Once you have filled in the required information,
- Click on “Schedule other events“
- Then, under “Frequency,” click the drop-down menu and choose if you want your event to be daily or weekly
- You can also create a custom frequency by clicking “Customize” on the calendar and choosing your dates.
Note: From under “Event Host” you can choose whether to host the event from your personal profile or a Facebook business page.
Best Practices to Make the Most out of your Event
Create a “Book Now” tab on Your Facebook Page
Creating an event on Facebook is easy, but there is one way to showcase all your events at one place on Facebook and provide a seamless booking experience to your audience.
With GoAllEvents Facebook integration, you can create a separate book now tab on your page with all your events. The audience can book tickets Online directly from your page and pay directly to your account without any redirection.
You know what the best part is; you don’t need to create an event on both platforms and add a link every time. Integrating once is enough. Whenever you create a new event on GoAllEvents, it will automatically update your events on the Facebook page.
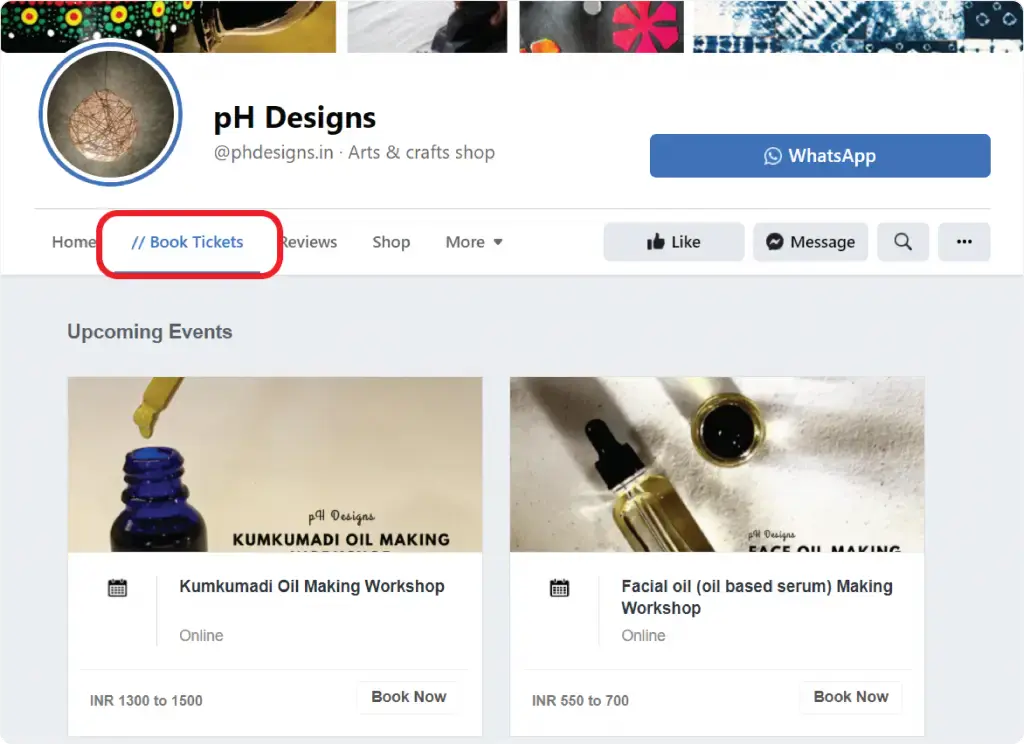
Learn more about how you can integrate your Events on Facebook very easily & sell tickets on Facebook.
What next?
Creating events on Facebook is just the first step towards making your events successful. The next step is to reach your target audience.
After creating Facebook events you need to put the effort into promoting your event or your published event will go down the drain. There are three ways to promote your event- pre-event promotion, during the event, and post-event promotion.
Follow the steps mentioned below to target your potential audience:
You can run Facebook paid ads for better results.
Facebook ads let you target a particular set of users for your event needs. Facebook ads serve different purposes like increasing event engagement on an ad, directing the audience to your event website, and generating more leads.
You can increase the reach of your event by targeting people based on their interests, behavior, and activities with effective advertisements.
There are some additional features that the Facebook ads manager provide
- Create lookalike audience
- Interest targeting
- Behavioral targeting
- Retargeting ads
Here, Most organizers make mistakes by just boosting an event, and they pay more money with less conversion.
The Best practice is to set up targeting and add your creatives manually. Then, organizers outsource this to marketing professionals for the best results.
Check out this offering by GoAllEvents.

You can post your events on event discovery platforms.
The main advantage of publishing your events on event discovery platforms is that they have their own subscriber base that might be interested in your event. That you can use to sell your event tickets. So, that gives you a headstart in reaching out to potential customers.
Some popular Event discovery platforms are:
Start getting the most from one of the largest social media platforms for your events and make your event a huge success.
FAQs on sharing Facebook event
Why creating events on Facebook beneficial to your event?
There are many advantages and benefits of creating events on Facebook.
- Facebook is one of the most popular social media platforms that engage around 33% of the world’s total population.
- Facebook gives you unmatched benefits of word-of-mouth marketing for your events as its algorithm presents your events to interested people and their connections all over Facebook; this way, your event reaches many more people, and you get a chance to broaden your audience.
Creating an event on Facebook is easy. First, we’ll show you how to create an event on Facebook. Then we’ll walk you through best practices for creating an event.
How to share a public Facebook event?
- Click on the “Events” tab on the left side of your profile or page.
- Click on “Hosting” from the menu on the side.
- Under the tab “Events You’re Hosting,” you can see all of your events. If you want to invite people to an event on Facebook, click on “Share.”
It will also give you more options to share your event via Facebook messenger or the news feed.
How to share a private Facebook event?
- Click on the “Events” tab on the left side of your profile or page.
- Click on “Hosting” from the menu on the left side.
- Under the option “Events You’re Hosting,” you will see all of your events. To share the event, select “Invite.”
- Search for friends by name, email address, or phone number. With any one of these details, you can invite all of your friends to an event on Facebook.
- You can also share an event on your Facebook page by adding a link to the event page.
Manali is a writer, editor, and content marketer by profession who specializes in event management and planning. She is working with AllEvents to help them create engaging content that drives the event organizers forward.
